5-25
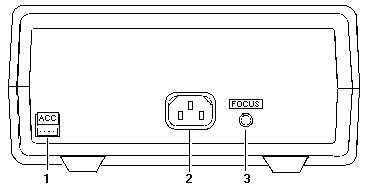
Figure 5-20.—Back panel.
OPERATION
The following sections explain how to use most of the front- and back-panel controls and connectors.
Each control and connector has already been briefly described. To review this information, refer to figure
5-18 and table 5-3.
Initial Setup
First, turn the POWER/INTENSITY knob located on the front panel to the clockwise, on, position.
Under normal conditions, the unit will come on with the following LEDs illuminated: power, channel A,
50/60 Hz, low range, and pulse/DC.
Focusing the CRT is very critical for the technician to be able to properly analyze the signature being
displayed. This is done by first turning the INTENSITY control to a level comfortable for the eye, and
then adjusting the FOCUS control (back panel) for the narrowest possible trace.
Aligning the trace will help determine, during troubleshooting, which quadrant the portion of the
signature is in during a change. With a short circuit applied to channel A (connect a cable between jack A
and COM), adjust the TRACE ROTATE control until the trace is as close to parallel as possible to the
vertical axis. Then, adjust the HORIZ (horizontal) control until the vertical trace is as close to even with
the vertical axis as possible.
Q-9. When aligning the trace with a short applied to channel A, which control should be adjusted to
bring the trace parallel to the vertical axis?
With an Open applied to channel A (nothing connected to A and COM test plug), adjust the VERT
(vertical) control until the horizontal trace is as close to even with the horizontal axis as possible. Once
set, these adjustments should not need readjusting during the unit's operation. However, remember that
each time the unit is used, this process will need to be repeated.
Range Selection
Four impedance ranges (LOW, MED 1, MED 2, and HIGH) can be selected on the Tracker 2000.
These ranges will become active when the appropriate front-panel button is pressed. To obtain the most
useful signature display when troubleshooting a component, you should always start by selecting one of
the two medium ranges (medium 1 or medium 2). If the display appears to be an open (horizontal trace),
then the next higher range should be selected to get a more accurate signature for analysis. If the display
appears to be a short (vertical trace), then the next lower range should be selected.


