1-12
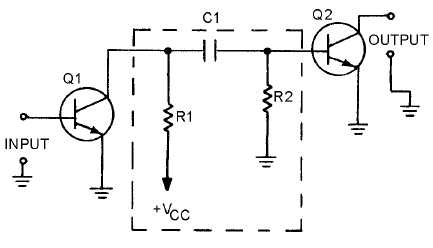
Figure 1-10.—RC-coupled transistor amplifier.
The network of R1, R2, and C1 enclosed in the dashed lines of the figure is the coupling network.
You may notice that the circuitry for Q1 and Q2 is incomplete. That is intentional so that you can
concentrate on the coupling network.
R1 acts as a load resistor for Q1 (the first stage) and develops the output signal of that stage. Do you
remember how a capacitor reacts to ac and dc? The capacitor, C1, "blocks" the dc of Q1's collector, but
"passes" the ac output signal. R2 develops this passed, or coupled, signal as the input signal to Q2 (the
second stage). This arrangement allows the coupling of the signal while it isolates the biasing of each
stage. This solves many of the problems associated with direct coupling.
RC coupling does have a few disadvantages. The resistors use dc power and so the amplifier has low
efficiency. The capacitor tends to limit the low-frequency response of the amplifier and the amplifying
device itself limits the high-frequency response. For audio amplifiers this is usually not a problem;
techniques for overcoming these frequency limitations will be covered later in this module.
Before you move on to the next type of coupling, consider the capacitor in the RC coupling. You
probably remember that capacitive reactance (X
C) is determined by the following formula:
This explains why the low frequencies are limited by the capacitor. As frequency decreases, XC
increases. This causes more of the signal to be "lost" in the capacitor.
The formula for XC also shows that the value of capacitance (C) should be relatively high so that
capacitive reactance (XC) can be kept as low as possible. So, when a capacitor is used as a coupling
element, the capacitance should be relatively high so that it will couple the entire signal well and not
reduce or distort the signal.
Impedance Coupling
Impedance coupling is very similar to RC coupling. The difference is the use of an impedance device
(a coil) to replace the load resistor of the first stage.


