3-10
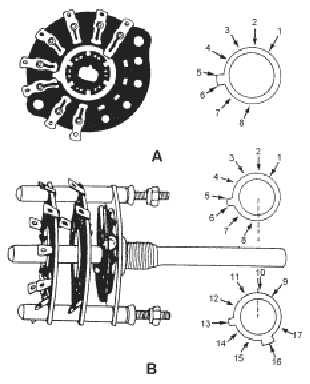
Figure 3-9(A) shows one wafer of a wafer switch and its schematic symbol. Contact 1 is the point at
which current enters the wafer. It is always connected to the movable portion of the wafer. With the wafer
in the position shown, contact 1 is connected to both contact 5 and 6 through the movable portion. If the
movable portion was rotated slightly clockwise, contact 1 would only be connected to contact 5. This
arrangement is known as MAKE BEFORE BREAK because the switch makes a contact before breaking
the old contact.
Figure 3-9.—Wafer switch.
Figure 3-9(B) is an illustration of the entire switch and its schematic symbol. Since the switch has
two wafers mechanically connected by the shaft of the switch, the shaft rotates the movable portion of
both wafers at the same time. This is represented on the schematic symbol by the dotted line connecting
the two wafers.
The upper wafer of the schematic symbol is the wafer closest to the control mechanism, and is
identical to the wafer shown in figure 3-9(A). When switches have more than one wafer, the first wafer
shown is always the wafer closest to the operating mechanism. The lower wafer on the schematic diagram
is the wafer farthest away from the operating mechanism. Contact 9 of this wafer is connected to the
movable portion and is the point at which current enters the wafer. In the position shown, contact 9 is
connected to both contact 13 and 16. If the switch is rotated slightly clockwise, contact 9 would no longer
be connected to contact 13. A further clockwise movement would connect contact 9 to contact 12. This
arrangement is called BREAK BEFORE MAKE. Contact 9 will also be connected to contact 15 at the
same time as it is connected to contact 12.
Q9. Label the switch schematics shown in figure 3-10A through 3-10G.


